I just bought a new Pi4 with 8GB of RAM. I run raspbian on it… It should serve as a teamviewer remote pc, but with any hardware periphery like monitor, keyboard, etc… just connected to LAN cable.
I just discovered that vnc and teamviewer work as long as the pi is connected to a monitor; when having plugged off the monitor, vnc and teamviewer do not work anymore, only ssh…
Somebody on the irc channel of raspbian said I should by a hdmi-emulator on amazon… I never heard of that hardware, but I surely can imagine what this does in theory… emulating as if a monitor would be connected.
My issues and questions to your are the following:
I can only find HDMI (normal HDMI) emulators on amazon… but not Mini-HDMI (as both ports on the new Pi4 are now “mini”)… or am I just too blind to find these?
Could I be really sure that this is the issue and it will just work when I put such an emulator on the pi?
Isnt there a software workaround for this? I remember that my pi2 and pi3 COULD serve as vnc and teamviewer servers, without having to emulate an output signal… I this case the pi4 is “worse” than 2 or 3… right?
Do you have any advice for me? I really would appreciate it and be very thankful for any help.
The keyword you want is an EDID Emulator. It doesn’t matter if it has pass-through (an HDMI out), it’ll work either way.
I didn’t see any mini-hdmi versions either but they’ll work fine with an adapter. I’d assume your problem is with a power saving feature though i’m not sure how it’s possible to turn off.
As a dirty hack you could SSH in, check if xrandr shows the monitor is off and turn it back on. If that works you could add a script to do that on startup.
I have a rpi4 running as a server and I connect to it without an HDMI dummy using nomachine, it uses dbus to start a session every time you connect to the pi and it closes on disconnect. It works really well, although 2 problems could be, that it is not a completely open source solution and that the build for the rpi4 that I am using is the arm64 alpha build. I have personally had a good experience using it this way and it is very convenient.
Alternatively I also use tightvncserver which can be set up to start a x “desktop” session every time you are going to vnc connect to the pi with something like remmina for added security you can also connect with a ssh port tunnel to vnc.
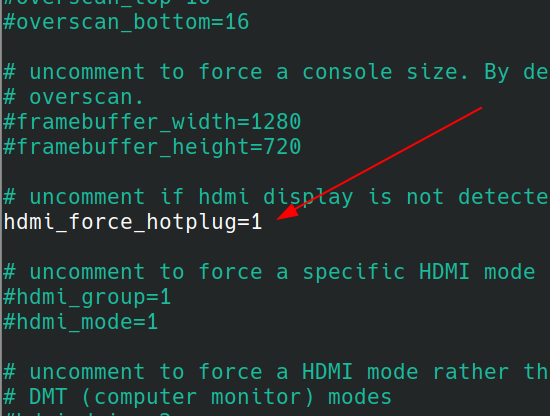
I think the best way would be setting the resolution you want in the /boot/config.txt although adding the parameter -Geometry 1920x1080 to the script starting the VNC server might do it.
If anyone wants the expansion on how to get the numbers for --newmode:
#Get the paramaters for your desired resolution/refresh: cvt <PIXEL_WIDTH> <PIXEL_HEIGHT> <REFRESH_RATE> #Example:cvt 1920 1080 60
#Copy everything after "Modeline " and paste as the <PARAMETERS>: xrandr --newmode <PARAMETERS> #Example:xrandr --newmode "1920x1080_60.00" 173.00 1920 2048 2248 2576 1080 1083 1088 1120 -hsync +vsync #The value of --newmode will be used later as <MODE_NAME>, example: 1920x1080_60.00
#Get the name of the screen to apply the new resolution to: xrandr #Example: Virtual-1
#Add the mode to the screen xrandr --addmode <SCREEN_NAME> <MODE_NAME> #Example:xrandr --addmode Virtual-1 1920x1080_60.00
#Switch to the new mode: xrandr --output <SCREEN_NAME> <MODE_NAME> #Example:xrandr --output Virtual-1 --mode 1920x1080_60.00